Photo Gallery In SharePoint
Recently I had posted a query on how to build a photo gallery as a no code solution in SharePoint?
Here is the solution!!!
Functionality:
Develop a WebPart to display the photo gallery as shown in figure below:

Each of the Photos in the gallery will inturn be linked to some URL.
I used the Content Query WebPart to do that. And it is not tough at all!!!
Let me elaborate the steps:
1) Create the list to store the url for the photos and the url where it should be hyperlinked to :
Let’s call the list as PhotoList
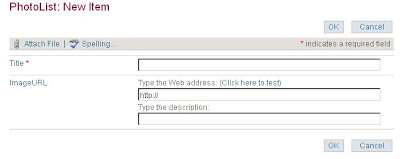
Title: Stores the url where click on that particular photo should redirect to.
ImageURL: Stores the image path. (Image description can be used as alternate text and as tool tip on hover.)
2) Modify ItemStyle.xsl
a) Navigate to the style library on the site(Go to View All site content -> Style Library)
b) Download a copy of ItemStyle.xsl
c) Add the following Custom Style template for our PhotoGallery
<xsl:template name="PhotoGallery" match="Row[@Style='PhotoGallery']" mode="itemstyle">

  <xsl:param name="CurPos" />

  <xsl:param name="Last" />

  <xsl:variable name="SafeLinkUrl">

    <xsl:call-template name="OuterTemplate.GetSafeLink">

      <xsl:with-param name="UrlColumnName" select="'LinkUrl'"/>

    </xsl:call-template>

  </xsl:variable>

  <xsl:variable name="DisplayTitle">

    <xsl:call-template name="OuterTemplate.GetTitle">

      <xsl:with-param name="Title" select="@Title"/>

      <xsl:with-param name="UrlColumnName" select="'LinkUrl'"/>

    </xsl:call-template>

  </xsl:variable>

  <xsl:variable name="LinkTarget">

    <xsl:if test="@OpenInNewWindow = 'True'" >_blank</xsl:if>

  </xsl:variable>

  <xsl:variable name="SafeImageURL">

    <xsl:value-of select="@ImageURL" />

  </xsl:variable>

  <xsl:variable name="tableStart">

    <xsl:if test="$CurPos = 1">

      <![CDATA[<div id="tablediv" style="overflow-x:scroll;width=550px;"><table border="0" cellspacing="5"


style="margin:0pt;padding:0pt;width:100%;"><tr width="100%">]]>

    </xsl:if>

  </xsl:variable>

  <xsl:variable name="tableEnd">

    <xsl:if test="$CurPos = $Last">

      <![CDATA[</tr></table></div>]]>

    </xsl:if>

  </xsl:variable>

  <div id="linkitem" class="item">

    <xsl:value-of select="$tableStart" disable-output-escaping="yes"/>

    <xsl:if test="string-length($SafeImageURL) != 0">

      <xsl:variable name="trimmedImageUrl">

        <xsl:choose>

          <xsl:when test="contains($SafeImageURL, ',')">

            <xsl:value-of select="substring-before($SafeImageURL, ',')"/>

          </xsl:when>

          <xsl:otherwise>

            <xsl:value-of select="@ImageURL"/>

          </xsl:otherwise>

        </xsl:choose>

      </xsl:variable>

      <td align="left">

        <div class="image-area-left">

          <a style="border:1px solid #9D0E2D;" href="{$DisplayTitle}" target="_blank"


title="{@LinkToolTip}">

            <img class="image" height="100" src="{$trimmedImageUrl}" />

          </a>

        </div>

      </td>

    </xsl:if>


    <xsl:value-of select="$tableEnd" disable-output-escaping="yes"/>

  </div>

</xsl:template>
d) Save the changes and upload the ItemStyle.xsl in its original location. Check In the file.
3) Modify ContentQueryMain.xsl
a) Navigate to the style library on the site(Go to View All site content -> Style Library)
b) Download a copy of ContentQueryMain.xsl
c) Make the changes highlighted below.
Under <xsl:template name="OuterTemplate.Body">
<xsl:call-template name="OuterTemplate.CallItemTemplate">
<xsl:with-param name="CurPosition" select="$CurPosition" />
<xsl:with-param name="LastRow" select="$LastRow" />
</xsl:call-template>
Under <xsl:template name="OuterTemplate.CallItemTemplate">
<xsl:param name="LastRow" />
<xsl:choose>
<xsl:when test="@Style='PhotoGallery'">
<xsl:apply-templates select="." mode="itemstyle">
<xsl:with-param name="CurPos" select="$CurPosition" />
<xsl:with-param name="Last" select="$LastRow" />
</xsl:apply-templates>
</xsl:when>
4) Add the content by query WebPart:
Add content by query WebPart and set the following properties for the WebPart:
a) Query -> Source -> Select Show Items from the following list -> browse to the PhotoList created in step1.
b) Query ->List type -> Show Items from this list type = Custom List
c) Query-> Content Type -> Show Items of this content type group = List Content type
d) Query -> Content Type -> Show Items of this content type = Item
e) Presentation -> Sort Items By = Created
f) Presentation -> Limit the number of items to display -> Item Limit : 100
g) Presentation -> Styles -> Group Style -> Default
h) Presentation -> Styles -> Item Style ->PhotoGalleryThe WebPart would not display any data at this stage. It would work only after completing the step below.
5) Modify the Content Query WebPart to display the columns required :
a) Export the Content Editor WebPart and save the .WebPart file on desktop.
b) Open the file locate and modify the following line :
<property name="CommonViewFields" type="string">ImageURL</property>Add the column name as shown in bold to include that in the view. Save the changes
c) Upload the WebPart back to the site.
You should be able to get a photo gallery as shown at the top(Of course with an assumption that you have content in the PhotoList J)
1.jpg)
3 comments:
Got the answer to your question now .. Use the Windows Live Writer to submit your post to blogs:
http://get.live.com/writer/overview?wa=wsignin1.0
thanks madhur, i will try this
I didn't figure out that this can be so simple as never dealt with a SharePoint image galleries, this looks quite effective. I am definitely going to try out this.
Post a Comment